PCjs Machines
Home of the original IBM PC emulator for browsers.
PCjs Blog
SPYing on MINIX
MINIX was an operating system I had always wanted to dig into but never really did. Too many other projects, including work, got in the way. I bought Andrew Tanenbaum’s first book on MINIX, along with the IBM PC AT version of MINIX, in 1987, but the book and diskettes mostly just collected dust on various bookshelves over the years.
Until 2022.
Years ago, I had included copies of my MINIX diskettes (the five 1.2M diskettes that Tanenbaum released for the PC AT) in the PCjs diskette repository, but once again, I didn’t do much with them. And in fact, MINIX didn’t originally boot in PCjs, and I never got around to investigating why. Finally, in late November 2022, after a small nudge from Michal Necasek over at OS/2 Museum, I decided to find out why.
The basic problem was that PCjs emulates the NEC µPD765 floppy disk controller (FDC) just well enough to satisfy how the IBM PC ROM BIOS uses it. MINIX, however, completely bypasses the BIOS. It replaces all the BIOS interrupt handlers and interacts directly with all PC hardware, including timer, keyboard, screen, and FDC. And it made several assumptions about FDC behavior that PCjs hadn’t dealt with properly before.
When I finally dug into why MINIX wouldn’t boot in PCjs, I found and fixed three separate FDC issues. The most severe problem involved how MINIX determined the number of sectors per track; since these particular MINIX diskettes were 1.2M, there were 15 sectors/track, but MINIX would not figure that out until first probing the disk using 3 other sets of diskette parameters.
Here are the 4 drive/diskette combinations MINIX runs through:
# Drive  diskette  Sectors  Tracks  Rotation Data-rate  Comment
0  360K    360K      9       40     300 RPM  250 kbps   Standard PC DSDD
1  720K    360K      9       40     300 RPM  250 kbps   Quad density PC
2  1.2M    360K      9       40     360 RPM  300 kbps   PC disk in AT drive
3  1.2M    1.2M     15       80     360 RPM  500 kbps   AT disk in AT drive
On a real machine, MINIX would get errors reading the disk using the first 3 sets of parameters, and only the 4th would succeed, whereas PCjs was happy to read sectors from the diskette regardless of the programmed data rate, and so MINIX would assume its diskette had only 9 sectors/track.
I was able to use VirtualBox and its built-in debugger, as well as the MINIX 1.1 floppy.c source code, to zero in on these floppy controller bugs, but I discovered some other issues along the way that still give both modern emulators and modern hardware grief when attempting to run MINIX.
The LOCK Prefix
There’s some code in the MINIX kernel that executes a “LOCK NOP” instruction, apparently as a special signal to the IBM PC simulator that Tanenbaum was using to develop and test MINIX. On CPUs prior to the 80386, “LOCK NOP” was harmless. However, since the 80386, the use of LOCK with non-memory instructions throws an “undefined opcode” exception.
The solution: run MINIX on PC (8086-based) or PC AT (80286-based) systems, or patch the “LOCK” prefix with another “NOP” (see MINIX 1.1 for the IBM PC AT for more information).
Note: the “LOCK NOP” instruction in MINIX 1.1 is located at 60:4497 when booting from the 360K diskettes and at 60:4329 when booting from the 1.2M diskettes.
The Video Adapter, Part 1
MINIX 1.1 assumed you were using either an original IBM Monochrome Display Adapter (MDA) or IBM Color Graphics Adapter (CGA), and therefore that scrolling the screen could be simulated by adjusting the CRT controller’s start address, as well as relying on frame buffer wrapping (4K on an MDA, 16K on a CGA). This is the same scrolling technique used by a handful of other programs, such as FlickerFree. Unfortunately, most machines newer than the PC AT, as well as most emulators, use a VGA, which doesn’t wrap on the same boundary, so scrolling will appear erratic.
The solution: run MINIX on a machine with an MDA or CGA, not a VGA.
The Video Adapter, Part 2
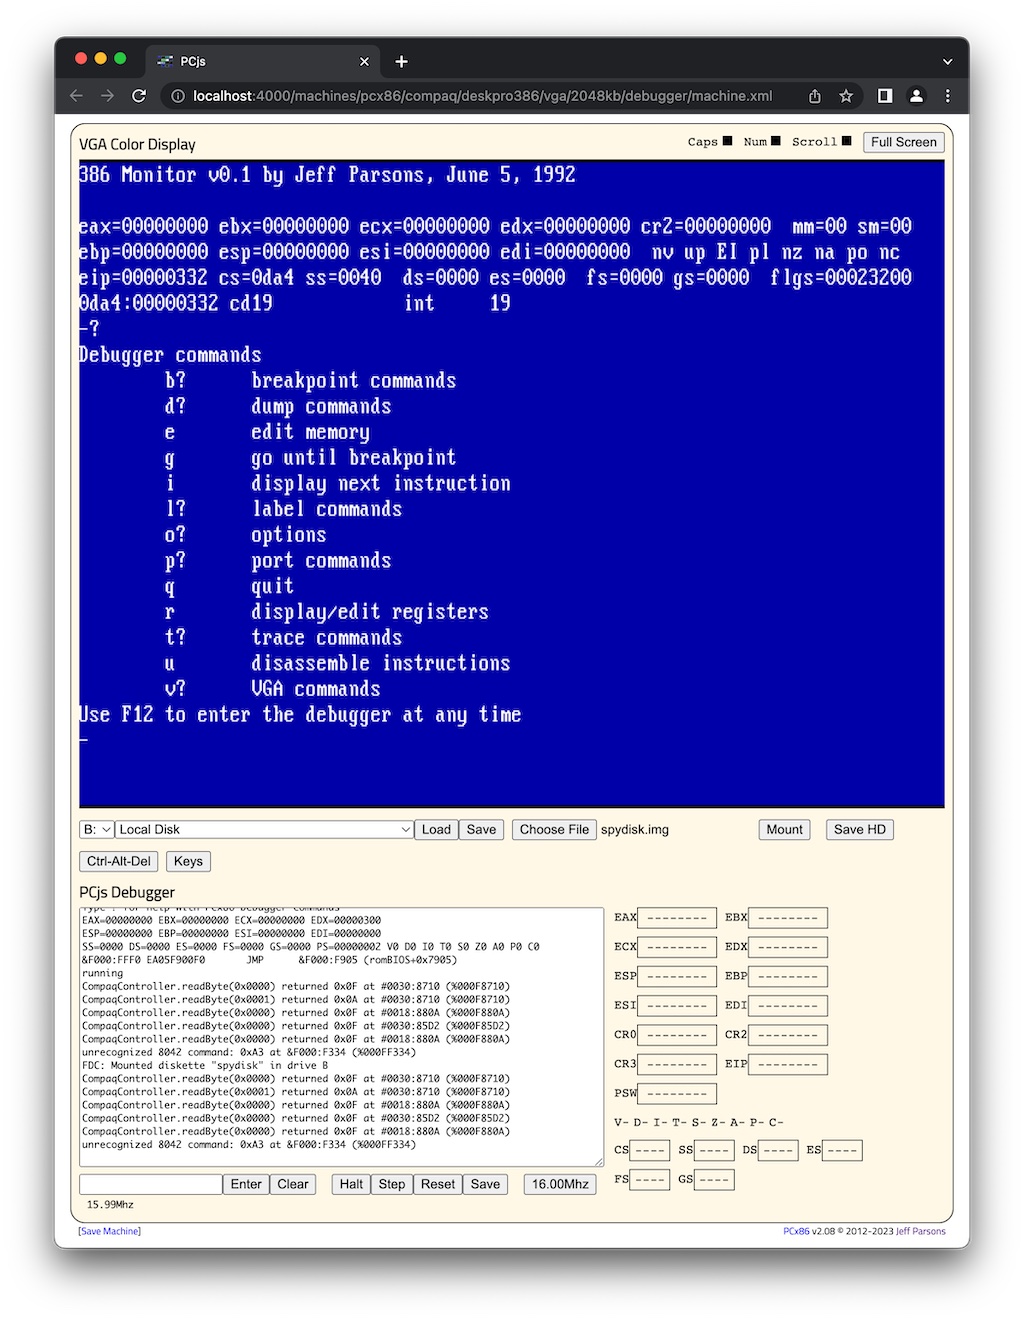
Another problem I saw when attempting to run MINIX (on 360K diskettes) using a COMPAQ DeskPro 386 with an IBM VGA (a doubly ill-advised combination) is that MINIX apparently unmasks all interrupts (not a good idea), and as a result, it starts receiving vertical retrace interrupts from the VGA, which in turn are not “EOI’ed” properly, which in turn prevents all further lower-priority interrupts (including the FDC) from being acknowledged.
In fact, the MINIX vertical retrace interrupt handler can be called before it has fully initialized all its memory pointers, in which case it will REP STOSW the value 0x0700 into the IVT at 0:0 instead of video memory – clearly not what it intended to do.
Obviously this is just another reason why machines with a VGA should be avoided. However, there is currently at least one PCjs COMPAQ DeskPro 386 machine with an IBM VGA that has been configured with vertical retrace disabled, if you really feel the need to test that combination.
The Speed of the CPU
On newer machines, MINIX may fail to load the root file system, displaying the following error:
Unrecoverable disk error on device 2/0, block 1
File system panic: Diskette in drive 0 is not root file system
The solution: slow the CPU down. I inadvertently solved this problem on a 233Mhz Pentium, thanks to an unintentional bug in my SPY Debugger: it had incorrectly left the CPU’s trace flag set, which meant that every instruction was being traced, and therefore running much slower than normal. A happy coincidence of this bug was that the “disk error” disappeared and MINIX successfully loaded.
Faster CPUs apparently cause MINIX to perform certain hardware operations too quickly. I didn’t see this problem in VirtualBox, presumably because even though its emulated CPU is faster than normal, its emulated hardware responds faster as well.
So, if you can, run MINIX 1.1 on an IBM PC AT with CGA.
Debugging on Real Hardware
Debugging on old, real hardware can be a challenge, especially if it’s an operating system like MINIX, which has its own boot loader and takes over the machine.
Fortunately, since MINIX runs entirely in real-mode, and since I remembered writing a tool for debugging code on an 80386 using v86-mode, I decided to resurrect it.
Introducing SPY: A Custom v86-mode Debugger for the 80386
SPY is a tool I wrote some 30 years ago to help debug issues with DOS (or other real-mode x86 software), especially issues occurring during the boot process, or issues that couldn’t easily be debugged with a conventional debugger. It effectively reboots the machine in v86-mode, with the debugger running in protected-mode, waiting for a hotkey (F12) or any unexpected faults, and interacts with the user via VGA and PC keyboard or serial port.
Since this tool was never meant to be an actual product, it makes lots of assumptions, does the bare minimum required to get the job done, probably contains a number of mistakes and bugs, and will no doubt crash in a variety of circumstances.
But, that said, I still think it’s a cool and potentially still useful piece of software.
Overview
Operation is simple: on an 80386 machine, from a real-mode DOS prompt, run SPY. Think of SPY like a glorified TSR, except that instead of terminating-and-staying resident somewhere within the first 640K, SPY switches to protected mode, relocates itself above 1Mb, saves the contents of the screen, switches to its built-in debugger, and then waits for you to give it a command.
The SPY debugger’s ‘?’ command will give you a list of other commands. At this point, you would normally just type ‘g’, which returns execution back to the real-mode portion of SPY – except that now the machine is running in v86-mode instead of real-mode.
You can press the F12 key at any time to jump back into the SPY debugger, inspect memory, set breakpoints, etc. You can even inspect the original screen using the ‘v’ command; pressing any other key returns control to the debugger. I have no recollection of how “complete” the debugger is, and I’m sure I will find more bugs to fix as I begin using it – all I’ve done so far is get it loaded and launched into v86-mode successfully.
SPY assumes your machine has at least 2Mb of RAM. Well, actually, it doesn’t really care how much memory you have below the 1Mb line (which could be 640K or less), but it does assume you have at least 320K or so above the 1Mb line; most of that memory is used saving/restoring the entire VGA state whenever entering/exiting the SPY debugger.
Rebuilding SPY
When I originally archived this project, I also saved a set of tools that can be used to build SPY from scratch – which was fortunate, because I’m not sure how easy it would be find some of those tools today.
SPY is a bit unusual because it’s a COM file with a mixture of 16-bit and 32-bit code, and the 32-bit code is a mixture of assembly and C. And except for the initialization code, it does not use any operating system or ROM functions. All screen, keyboard, and serial port hardware operations are handled internally.
The C compiler, CL3232, wasn’t really designed for producing code in this environment. One of the challenges I ran into when trying to rebuild SPY was re-discovering that code and data fixups were being made relative to their respective ‘CODE’ and ‘DATA’ classes. This wasn’t really a problem, as all the code assumed a small flat memory model where CS != DS anyway.
Well, almost all the code. The C compiler didn’t appear to make any assumptions about CS and DS, with one exception: when generating code for switch statements, it would produce in-line jump tables, and it would “JMP” through those tables without a CS override. In other words, there was an implicit assumption that CS == DS.
So, I wrote a crude little C program, FIXASM, that looks for those
“JMP DWORD PTR” instructions and inserts a “CS:” override. This also meant changing the
MAKEFILE to have CL3232 produce assembly files instead object files,
running the assembly files through FIXASM, and then assembling them with ML. Problem solved.
[As an added bonus, using CL3232 to produce assembly files instead of object files seems to have eliminated some overhead, because the overall size of the COM file dropped by about 5K. I haven’t looked into it yet, but I did verify that all DEBUG code, including asserts, was still in place. Strange.]
There were a number of other minor problems, like some unexpected padding between code and data sections, failure to preserve the initial interrupt mask registers (IMRs), and failure to allocate memory for the VGA save/restore operations. I call these problems “minor”, but they all took a while to track down. Fortunately, the PCjs Debugger was a big help, although I also had to use the VSCode debugger to debug some problems in PCjs, so as an added bonus, I ended up fixing a few PCjs bugs as well.
All these issues made a few things clear: I had probably used an older version of CL3232 than what I originally archived (I’ll keep looking for it, but I probably don’t have it anymore), and I had probably started reworking some of the SPY code in 1993 and never finished the changes.
In any case, SPY is once again operational – or at least, really close.
Note
Yes, it’s been a while since I worked on anything PCjs-related that I felt was worth a post. Hopefully I’ll find more time and more topics to energize me and this blog in 2023. In the meantime, Happy New Year!
Jeff Parsons
Dec 28, 2022